This overview covers:
Connecting to a Chado Database
The following java flags are used when running Artemis when connecting to a
database. These options currently are all needed.
-Dchado
this is used to get Artemis to look for the database.
The address of the database (hostname, port and name) can be conveniently
included as follows:
-Dchado="hostname:port/test?username"
these details are then the default database address in the popup login window. A
list of available databases can be provided in the Artemis options file
these are presented in a drop down list in the login window.

-Djdbc.drivers=org.postgresql
this is used to define the
JDBC postgres driver
.
-Dibatis
use the iBATIS Data Mapper
So the command line will look something like this example:
 ./art -Dchado="localhost:2996/test?tjc" -Dibatis \
             -Djdbc.drivers=org.postgresql.Driver
For a read only connection -Dread_only is specified on the command line:
 ./art -Dchado="myhost:5432/dbname?user" -Dibatis \
             -Djdbc.drivers=org.postgresql.Driver -Dread_only
Note that for Mac OSX Artemis/ACT installations there is an app version that
provides "out of the box" Chado connectivity. In this case when selecting the
Artemis app a Chado login window will be immediately displayed. This version
has its own download link on the GitHub pages.
Reading From the Database
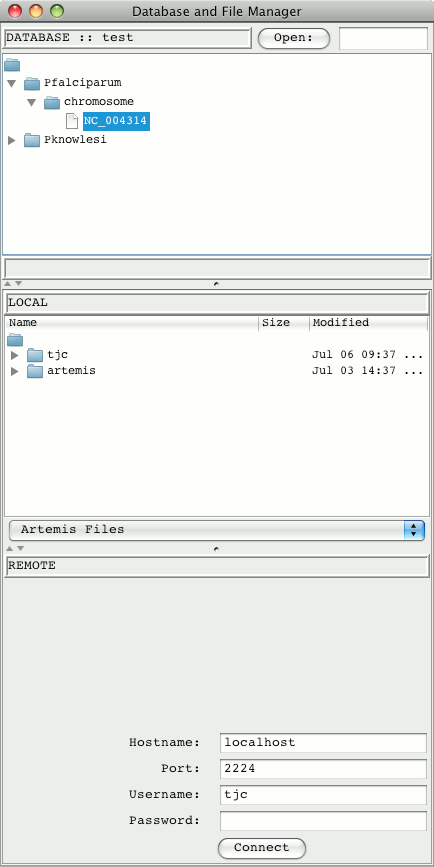
On a successful login a database and file manager window will open up.
The database manager will display "Database Loading...". The organisms
in the database with residues are shown in a expandable tree. Double
clicking on the sequence names opens them up in Artemis. Alternatively
a gene name or chromosome name came be typed into the text field at the
top and the Open button used to launch Artemis.
A sequence can be opened in Artemis from the command line (without going
through the database manager). This is done by supplying a command line argument
with the organism and chromosome (or source feature):
Pfalciparum:Pf3D7_09
and optionally a range can be included to just display features within it:
Pfalciparum:Pf3D7_09:92000..112000
this could be used in combination with the -Doffset=base flag (e.g.
-Doffset=10000) to open Artemis at a particular section of a sequence
To reduce the number of transactions to the database, all of the sequence is
read into Artemis. This includes most of the feature qualifiers. There are some
qualifiers (ortho/paralog and similarity qualifiers) that lazily load their data
as and when it is needed, i.e. when opened for viewing in the gene builder.
This lazy loading improves the performance of reading data from the database
for sequences with a large number of features.
iBatis Database Mapping
The iBatis data mapper framework has been used to facilitate the
communication with the database from Artemis. It uses XML descriptors to
couple the SQL statements with the Java objects that Artemis understands.
The XML maps are in 'src/main/resources/artemis_sqlmap'
in the Artemis distribution. These are divided up into files based on the
Chado table names.
The SQL statements can be seen in the Artemis
Log Viewer window:
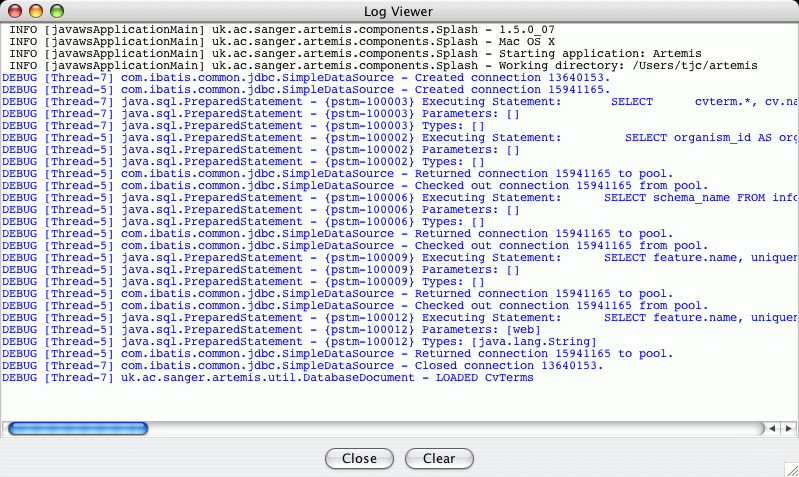
This is mainly useful for debugging and tracking problems with reading
from and writing to the database. Artemis uses
log4j to produce logging
and the configuration file for this is in the file 'etc/log4j.properties'.
Gene Representation
Below is an illustration of how the feature are stored in Chado
in the Sanger PSU.
Gene Model
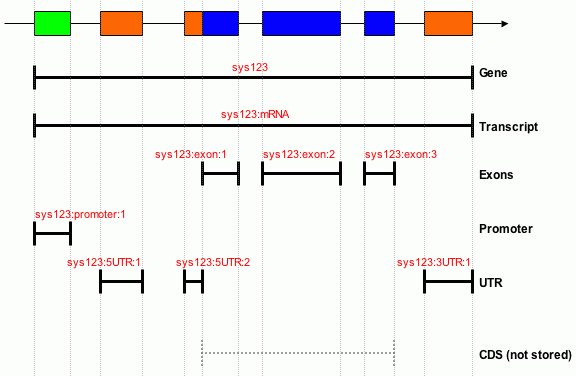
The names (in red) are the internal database uniquenames. These names are
automatically generated by the gene builder from an ID provided by the
user. N.B. in our data model UTRs are represented as distinct from
exons.
For the scenario where both the CDS and UTRs are not stored and their positions can be
inferred from the exon and polypeptide features set chado_infer_CDS_UTR=yes in the
Artemis options file. Adjusting the polypeptide boundaries
in the Gene Builder will then result in the generation or deletion of UTRs.
Gene Building
A gene can be created in Artemis (or ACT) by highlighting a base range and selecting
from the 'Create' menu the 'Gene Model From Base Range' option.
This prompts for a unique ID and this corresponds to the names in the above
gene model representation. The basic constituent features are created; i.e.
gene, transcript, CDS and polypeptide. N.B. Artemis joins the exon
features and represents them as a CDS feature. These are shown on the frame
lines in the feature display window.
A gene builder for a selected gene feature can be opened from the 'Edit' menu
by selecting the 'Selected Feature in Editor' option or simply using the 'E'
shortcut key.
The Artemis Gene Builder
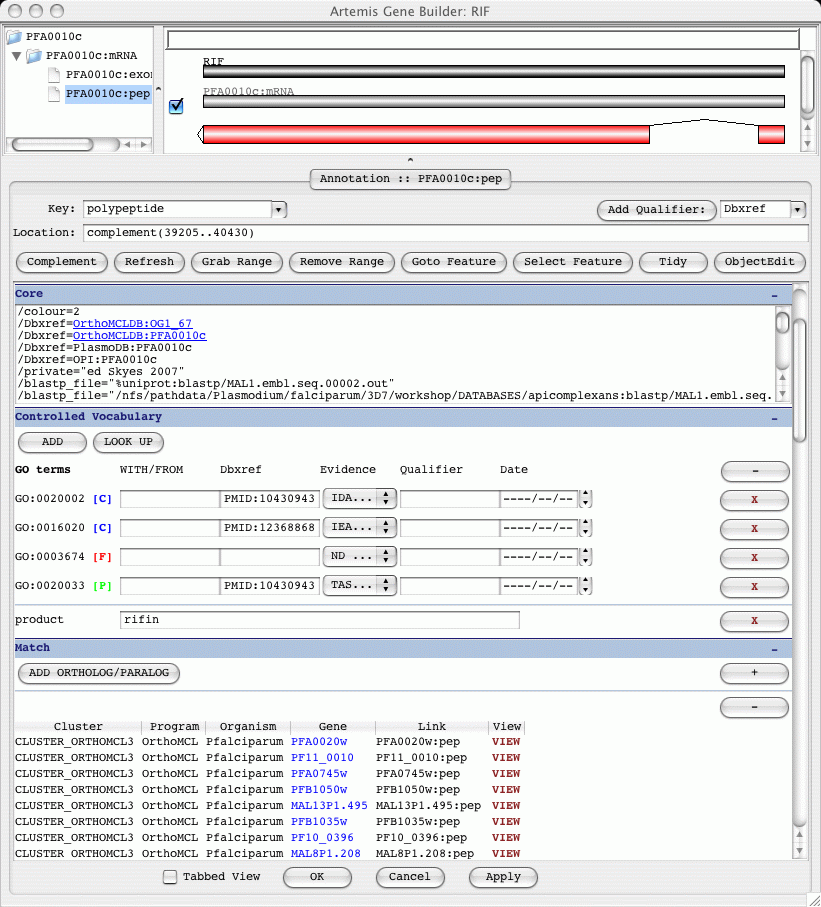
There are two distinct parts to the gene builder window. The top part shows
the gene hierarchy and structure. The bottom part shows the
annotation associated with one of the constituent features.
These two parts of the gene builder are described below.
- Gene Hierarchy and Structure
The top left hand side is a tree structure of the gene model. To the right
of this is a graphical representation of the features. A feature can be selected
from either the tree or the graphical view. The annotation for the selected
feature is displayed in the bottom part of the gene builder.
Structural changes can be carried out in the graphical view. The feature ends
can be dragged to adjust their coordinates. On right clicking on this area there
is a popup menu for adding and deleting features in the gene model.
Editing the Gene Model In the Gene Builder
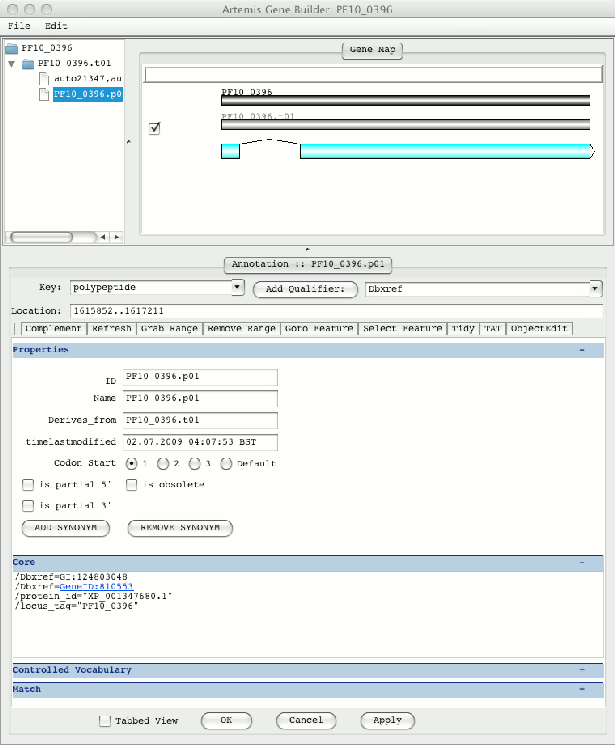
Additional transcripts can be added from here. The checkbox to the right of
the above CDS is used to hide and show the associated CDS in the Artemis
feature display. This can make structural edits clearer for multiple transcripts.
- Annotation
There are 4 (Properties, Core, Controlled Vocabulary and Match) sections in
the annotation part of the gene builder. These are described below. These can
be viewed in a scrollable view or in a tabbed view. There is a check box at
the bottom of the gene builder to change between these views.
- Properties
This contains properties such as the synonyms and time last modified. Also
the ID and Name of the feature are given here, for a gene feature this is
used as a systematic identifier and a primary name.
Synonyms are added as a controlled vocabulary (these are in
a cv named 'genedb_synonym_type'). The 'is obsolete' check box is
used to indicate if this is an obsolete feature. The feature is then marked
as obsolete in the database. Artemis (by default) does not show obsolete
features in the feature display and they are shown greyed out in the
feature list.
Properties section

- Core
The core annotation contains any other annotation that does not fit into the
other sections. E.g. comments, literature, Dbxref. Hyperlinks are
provided for SWALL, EMBL, UniProt, PMID, PubMed, InterPro and Pfam, and opening
up a local browser.
- Controlled Vocabulary (CV)
The CV module in Chado is concerned with controlled vocabularies or ontologies.
Therefore, Chado can use the biological ontologies and this makes it very
expressive.
This section in the gene builder provides a form for adding and deleting GO,
controlled curation, product, Riley class annotation. CV terms are added by
clicking the 'ADD' button. When adding a term to a feature the user is
prompted for the CV name and then keyword. The term to be added is then
selected from a drop down list of terms containing the word or phrase.
To further assist in finding the CV term from the list, typing in the
text will start to autocomplete and scroll to the first matching term.
CV section
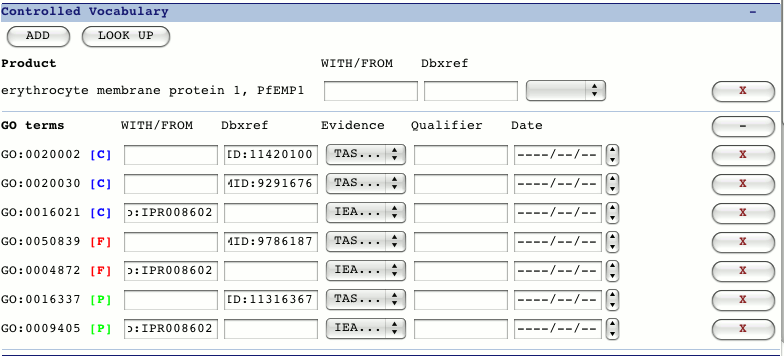
GO terms are selected from molecular_function, biological_process
or cellular_component CV's.
Products are stored in Chado as a CV (i.e. in cvterm in
a cv named 'genedb_products'). They can be given evidence codes
and have associated WITH/FROM and Dbxref columns.
Other generic controlled curations can be found by Artemis and shown
if their CV name in Chado is prefixed with 'CC_' (e.g.
CC_controlledcuration, CC_workshop). These then appear in a drop down
list when adding CV terms to a feature.
Adding new terms to the database can also be done from this section.
In the drop down selection of CV's there is an 'Add term...' option.
This opens an input panel for new terms.
Adding a new CV term

- Match
This section allows the user to add ortholog/paralog links to other genes
in the database.
The ortholog/paralog tables provide links for opening the gene editor or
an Artemis window for each entry. The 'VIEW' button opens a
separate Artemis displaying the gene ortholog or paralog and the
surrounding features.
In addition similarity qualifiers can be added here from matches to
blast and fasta searches carried out in Artemis. These are added
from the Artemis Object Editor.
Gene merging and splitting
To merge gene models, select the CDS segments that are to be merged. Then use
the menu option:
Edit->Selected Feature(s)->Merge
The annotation and names from the segment first selected are maintained and
the CDS features from the second gene model are added to the first selected gene model.
The second gene model is deleted automatically.
To unmerge (split) the gene model into two gene models consecutive segments
in the CDS are selected. This is done by clicking on the first segment and
then pressing SHIFT and clicking on the second segment. Then use the menu option:
Edit->Selected Feature(s)->Unmerge
On unmerging the annotation and synonyms are maintained in both gene models.
The second gene model component features are given a new internal ID (uniquename)
based on the original and prefixed with DUP1-.
Transfer Annotation Tool
The Transfer Annotation Tool (TAT) within Artemis can be used to transfer annotation
between features within an EMBL file or features within the same Chado database. It
is opened by clicking on the "TAT" button in the Feature Editor or, in database mode,
the Gene Builder.
Transferring Annotation
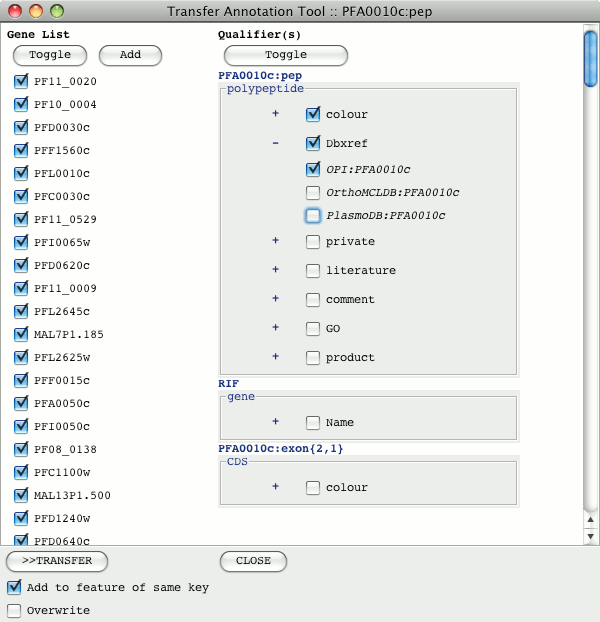
The left hand column shows the list of orthologous genes. Features can be added to
this by clicking the "Add" button and pasting their systematic ID in. Multiple genes
can be added by separating their names with spaces or line returns. The genes to
transfer annotation to can be selected or de-selected. The toggle button above the gene
list will toggle the selection.
On the right hand side are the qualifiers associated with the feature and any other
features in the gene model. The qualifiers to be transferred are selected from this
list. The '+' button expands to show the list of values associated with that qualifier
from which those to be transferred can be selected.
Qualifiers on different features of the gene model that are selected will be transferred
to the equivalent feature type in the genes they will be added to.
The default behavior is for qualifiers to be appended to any existing qualifiers.
However if the 'Overwrite' check box is selected at the bottom of the tool then existing
qualifiers of the same type will get deleted and it will add in the new qualifiers.
Writing To The Database
When a feature or qualifier is changed, added or deleted the 'Commit' button (on
the top tool bar) changes colour to red. Changes in Artemis only get written back to the
database when this button is clicked.
Commit Button

There is also an option under the 'File' menu to 'Commit To
Database'. Note in ACT there is no commit button and the 'Commit To
Database' menu option is used to write back to the database.
If there is an error during the commit then Artemis will provide the option to
force commit. This means it will commit what it can. Naturally this can be potentially
problematic. Therefore, committing back to the database frequently is encouraged.
Any errors are reported in the log viewer.
Community Annotation
Multiple users can launch Artemis and query the database. This has been stress
tested and used in the malaria re-annotation exercise with 30+ Artemis clients
connecting to the database.
Artemis records the time a features was last modified (timelastmodified). Before
changing a feature it will check this time stamp against the database record of the
timelastmodified.
If the corresponding feature in the database has changed by another user it will
ask whether to continue with the commit process.
Writing Out Sequence Files
Artemis can write out EMBL and GFF files from the database. An option is given to
optionally flatten the gene model to just a CDS feature. Also an option is given to ignore
any obsolete features. For EMBL it uses mappings for conversion of the keys and qualifiers.
These mappings are stored in the 'etc/key_mapping' and 'etc/qualifier_mapping'
files.
A script (etc/writedb_entry) is also provided as a means of writing out multiple
sequences from the database. The script takes the following options:
-h      show help
-f      [y|n] flatten the gene model, default is y
-i      [y|n] ignore obsolete features, default is y
-s      space separated list of sequences to read and write out
-o      [EMBL|GFF] output format, default is EMBL
-a      [y|n] for EMBL submission format change to n, default is y


